Showing posts with label fabric crafts. Show all posts

Wednesday, 2 October 2013

Scouts Canada: The Accidental Beaver Leader, or How to Become "TicTac" Without Even Trying.


As is mentioned in my "about" section, I am a Scout Leader in my neighbourhood.  Dragged into it practically kicking and screaming last year by my hubby, who didn't want to volunteer alone, I've actually come to enjoy it quite a lot!  But, like every volunteer organization I've ever been part of, there are never enough people to do the work; there's always something more that needs done, and everyone is pushed to the max so extra tasks end up being sort of...well, assigned.

Not that I'm complaining...too much...

I started out last year as an Assistant Advisor to the Venturer section (kids 14-18) last year, and slowly added on duties as necessary, which included being an Assistant Advisor to the Rover section (18-26), and trying to help out as the Registrar (major fail on my part, sadly, thanks to a bad case of the flu).  This year, however, it's a new ballgame and my volunteerism has been increased by a lot.

My friend Kat became the Beaver Section Leader this year due to attrition, even though she had only been an Assistant Beaver Leader for the year prior (and yes, hubby and I sort of dragged/tricked her into the role).  We're not sorry about our finagling her assistance: she is freakin' amazing with kids! Children just like and trust her automatically, and she has absolutely no fear.  Even my nephew as an infant automatically liked her, and will now make a beeline for her and try to crawl up her legs whenever they meet.

When Kat realized this past summer during planning for the new Scout year that she didn't have enough adult leaders to run a colony, she asked me to assist her with the Beaver section. After begging me for months (and me saying variations of "aww-hell-no!"), I finally said "ok" because the need was desperate, and it was only to be a stop-gap measure until she found more adult Leaders.  I'm not all that comfortable around small children, but I had originally agreed to join Scouts to not only do something together with the Hubster, but to improve my ability to connect with little kids because I want to be a good Aunt to my now 11-month old nephew. And hey, it looks pretty good on a resume. /selfishness

Now, however, through the well-meaning machinations of Kat and our Group organizer, I seem to have been firmly ensconced into the weekly meetings for the foreseeable future, I have even been bequeathed the title, "Tic-Tac" (one of the Beaver Leader names).  There is a lot of shrieking, a lot of running, and what I would call barely-controlled chaos...and that's just the Leaders (ba DUM-bum!). But I'm hanging in, because Kat needs me, and I don't mind it too much.  I would like my Thursday evenings back, but this is a small price to pay. So far.

My favourite part of the whole experience?  I swear, it's making the crafts!  Did I not get enough of this when I was a kid?  I'm starting to think I was deprived of good crafting sessions when I was young. We research all of the crafts we can do with Beaver-age kids, and I am overcome with a desperate desire to go to dollar stores and BUY ALL THE THINGS!  I even have my own Pinterest page up for Scout Crafts, since I've found so many awesome resources onsite.  So, if I *must* be around lots of screaming kids for a couple of hours a week, well, at least I get to do crafts too.

A perfect and recent example? Last night, we found a great cooperative game (beanbag tag) that required several beanbags, one per player. We do not have beanbags; correction - we *didn't* have beanbags.  When we decided to do that game for this week's meeting, I got all enthusiastic, pulled out my sewing machine, grabbed some strong fabric material from my crafting Tickle Trunk (AKA where craft supplies go to die), and Kat and I whipped up a dozen and a half beanbags in about an hour. We only stopped because I ran out of dried navy beans to fill more beanbags with; I'll pick up some more tomorrow and make half a dozen more just for kicks.

So yeah, I guess I'll be sticking around for a little longer; this TicTac has a LOOOOT of crafts to make to satisfy my inner child before I've had enough. Oh and yeah, the kids are cute as buttons, too...if a bit shrieky....heh...


Wednesday, 25 September 2013

Wedding Day Brooch Bouquet


Photo: Wedding bouquet (close-up).Back in August, I wrote a blog post and included photos of my fabric and bead flowers prior to construction of my brooch bouquet. Now that the wedding has come and gone, it is time to reveal my fabric flower/brooch bouquet in all its colourful glory!

The wedding colours were sky blue, yellow and red. And for the record,I LOVE my bouquet! I know many will think it's incredibly gaudy, but I just don't care; anyone who knows my personality would know that it fits me perfectly! And I'm so glad I'll be able to keep this memento of a wonderful day for decades.

The fabric and felt flowers were made by me, and the brooch and bead flowers were made by my excellent friend, Sheila, of Elegant Simplicity Jewellery Design. She had originally put the bouquet together herself temporarily, but being the picky bride that I am, I decided to start afresh, and ended up taking it apart and putting it together myself, adding the feathers, bead strings, and white ribbon at the base of the bouquet. It was unsurprisingly heavy, as you can imagine.
I may write a post in the future on how to make your own brooch bouquet, but considering how much money this little thing cost, and how many grey hairs Sheila and I both grew working on this for literally MONTHS, my advice right now is to just go out and commission one from a trusted vendor. Depending on your preferences, they go for as little as $50, up to about $1000 (no kidding!).  Check out Etsy sometime; you will be amazed.


To the right is my favourite photo of me holding the bouquet, just as the processional music played and I went to meet the love of my life on the top deck of the yacht, anchored at Toronto's Hanlan's Point lagoon with the city sky-scape in the background. We were married in front of a small group of our family and friends, while the CNE Airshow swooped and screamed in the sky just to the West of us (fun times!), and I barely remember any of it from my nervousness, lol...

If I had the opportunity for a "do-over", I probably should have taken the Hubster's advice and just got married at City Hall, had an awesome sit down dinner afterwards at a fancy resto downtown (360 in the CN Tower, anyone?), then spent the next two weeks living it up in Paris. But...this is what I chose. I don't actually regret my choice; when I play the "what if" game, I know that I would have always regretted not having a family wedding...but there will always be a part of me that wonders.

I would still have totally made this kick-ass bouquet, though.
 
Photo: My wedding bead bouquet!

Tuesday, 13 August 2013

How to decorate your wedding on a dime


...to be clear, I don't mean an *actual* dime, I simply mean for far less money than the wedding supply stores would have you believe.

Now that the disclaimer is out of the way...

If you live in a reasonably-sized city centre, have access to a large Dollar store in your area, or are planning on visiting an area which does, I strongly recommend you check out the offerings there before you lay down serious cash at a high-end crafts or wedding store. At one dollar store alone, I saw wedding favour boxes, invitations, cake toppers, boxes of those little bubble blowers for guests, thank you cards, bridal hairpieces, pretty baskets, and a host of other items that, with a little imagination and effort, you can customize to your wedding colours, and personalize so they reflect the style of wedding you want.

In this series of posts I intend to discuss some of the things I did for my wedding, as well as some great dollar store wedding decor/favour ideas I've seen around the interwebs that I never had time to do myself but were pretty nifty! As the tutorial for each wedding DIY could be lengthy, I will post them separately so none of the posts end up too long! When I finish them all I will leave backlinks to the other posts.

Fabric flower guest boutonnieres/corsages:

One of my all-time favourite crafts have been these little flower corsages/boutonnieres. I've made a bunch of these for my wedding guests, which will be interspersed with some real and paper flowers, a pair of scissors, and some safety pins in a DIY Boutonniere station. The idea was to have a fun little task for our guests to work on while we're waiting for the all-aboard so we can cast off (our wedding is on a boat that will be cruising around the Toronto harbour for several hours). I also have a few of the best ones that I made in my wedding colours, which I have interspersed throughout my bridal bouquet. Lastly, I made a series of these flowers, in broadcloth in my main wedding colour, and attached them to the fronts of the personalized thank you cards I sent to the guests who attended my bridal shower last month (and yes, I bought the pretty blank cards at the dollar store, so there's another savings!)

In any case, on to the flowers themselves: I used both cotton regular-weight broadcloth in a multitude of colours and some smashing-looking felt too.  I finished them with beads, plastic gems, or buttons depending on my whims.  The most important thing to have for this craft besides a good, sharp pair of scissors is a glue gun; in my honest opinion, you absolutely can't do this craft without one.

Despite their fiddly nature, these are surprisingly easy to do; you don't have to be super-accurate, which is nice.  As long as you have a reasonably steady hand, don't mind the tedium of cutting out and shaping each petal individually (or you can buy yourself some fabric petal cutters, but I was going for cheap-to-nearly-free-so-use-what-I-have), and can figure out the quadrants on the face of a watch (3 o'clock, 6 o'clock, etc.), then you can make these up in a trice. I did most of mine while plowing through several episodes of Law and Order: CI and CSI: Miami. Aww yeahhhhh.....

Supplies:
  • An amount of light to medium-weight fabric in your choice of colour and pattern -- the sky's the limit. Best choices are non-ravelling fabrics such as cotton and felt, which hold scissored edges well, but feel free to experiment with different fabrics to see what works best for you. Foam sheets could be cool too!
  • A sharp pair of scissors, clean and rust- or stain-free so they don't damage your fabrics
  • A crafting glue gun, using low-temp glue
  • A handful of glue sticks, of the type for gluing fabrics together
  • A clean, protected working surface (be warned, those hot glue guns tend to drip!)
  • Pin backs or something to help stick the finished flower to whatever you're going to stick it to
  • Petal fabric punches, two sizes (optional)
Instructions:
  • Assemble your supplies. Decide on the amount, colour/s, and relative size of your finished flowers (this is completely subjective and in accordance with your intended use; each of my flowers in the photos are about 3-1/2" in diameter, so I will give instructions based on those calculations).
  •  Choose a backing colour for your flowers; the backing circle (mine were about 2" in diameter) can sometimes be seen through the petals, depending on the fabric used for the petals. I used felt for some stability and decided on some green and some white backs. Cut out as many backing circles as you want flowers. I won't insult your intelligence, dear readers, by giving you exhaustive instructions on how to cut a perfect circle, but simply mention that there's no need to break out the protractor if you take the time to go on a five-minute treasure hunt through your own home. Cups, bowls, jar lids, buttons, you name it; they're all round. Find the size that best fits what you need and trace its shape onto some felt backing, then cut out. If it helps, here is a template that will give you an idea of the relative sizes of petals and the backing circle:
    Feel free to customize the petal shape a bit; try some new things!  I won't judge. I got some of my nicest looking designs from altering the petal shapes a bit. I also only used the largest and smallest petal shapes, and not the middle size.
  • Speaking of petals, you will need at minimum two sizes of petals. I decided on a loose petal dahlia-style, with only 2 layers, though if you make your backing circle large enough you can make a multi-layer dahlia-or-poinsettia-style flower that will "dome" beautifully.
  • Cut out and shape the petals; for a flower like mine, I needed 8 large and 8 small petals; for larger dahlias or multi-layered dahlias you will need more. Make many more than you need; you may find that certain petals fit better together than others anyway.
  • A few minutes before you are finished cutting and shaping your petals, plug in your glue gun  and keep it handy; now is the time to bring 3D life to your petals! Holding the petal pointy-end away from you with your thumb and index fingers of your left hand (or if you're a lefty, the right hand), carefully and SPARINGLY glue a thin line of glue along the bottom of the petal. Immediately pinch closed and hold for a 5-count until the glue cools and sticks. For a different, more "cone" look to the petals, instead of pinching the two raw ends together, fold each bottom end's corner in towards the centre along the line of glue.
 
  •  
    Left = "cone" shape; Right = "pinch" shape


For a "ruffled" look, crease the centre bottom then glue the two edges together. 


  • Start attaching the largest petals to your backing circle by placing a small line of glue at the 12 o'clock position on the edge of the petal and 1/4" inwards; place the petal pointy-end outward vertically along the glue with the petal sticking out at least 1/2" beyond the backing circle, press down gently until sealed. Repeat this for 6 o'clock, 3 o'clock and 9 o'clock. Now start filling in around the perimeter of the outer circle with the largest petals, symmetrically, until all the spaces are filled.  Do not crowd the petals, but don't leave any gaps either.
  • Repeat the the inner circle, using the next-smaller petals, again using the 12-6-3-9 o'clock method to ensure the flower is symmetrical. IF you are making a larger flower, repeat these steps until you have filled in the entire flower with only a small untouched circle in the middle.
  • Using a gem, button, bead, or other item of your choice, hot glue into the centre of the flower and gently press down until the glue cools.
  • Place the pin attachment on the back of the flower.
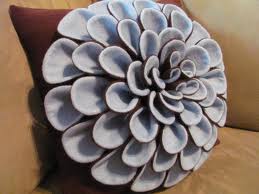
Here are some examples of felt flowers you may want to use as inspiration (with thanks to etsy, craftsy, and various blogs and tutorials I borrowed these beautiful pics from!).  My apologies for showing only the dahlia-style flowers made from felt; when I tried to find more pictures of flowers like I had done, I wasn't able to find any!  Has nobody else thought of making felt dahlias...NOT out of felt?  Not as far as I can figure! In any case, so endeth my first long-winded tutorial on how to make fabric dahlia-or poinsettia style flowers. Good luck, and let me know if you have found this tutorial useful!