Sunday, 25 August 2013

So many activities...so little time...


I realized recently that the reason I've developed so many hobbies and activities in the last couple of years, is because I have all this free time on my hands that used to be devoted to going to university classes at night and working full time during the day. 

After ten years of part-time post secondary education, I'd been jonesing for something to capture my interest and stimulate my imagination.

One of the best time wasting investing things I've picked up this year has been a return to tabletop role playing games; while I'd originally delved into this world for a short while at the ripe old age of 25 (yes, very late, I know...), the opportunity came around to try it again, with a D&D-offshoot game called Pathfinder.

While the three original players who were the most enthused about running this game are now long gone, my hubby, a mutual friend, and I have decided to keep it going anyway. We've brought in some new players, we're learning a lot about the game as we go along, and we're having a huge amount of fun playing campaigns!

I'm enjoying it so much, in fact, that I've decided to join the world Pathfinder Society, and am committing to playing a certain number of games a month at a local game store with other enthusiasts (remember, strangers are just friends you haven't met yet!).

So yes, I am a "gamer geek", although not nearly as hardcore as some of my other friends. I just enjoy the imagination, creativity, and sheer lunacy that goes into these games, and I always seem to have a great time.  I'd recommend this to any teens or young adults who are looking for something that gets them out and meeting new people, who don't judge or look down on you because you're not wearing the right brand of shoes. In Pathfinder, nobody cares what you look like on the outside; they just want you to bring your funny bone to the table!

Saturday, 24 August 2013

Wedding Cake Commission - August 2013

Here are some photos of a wedding cake commission I did for a new client a few weeks ago.

The bride to be wanted a very simple cake; three Madagascar vanilla tiers to serve 100 guests, with vanilla Swiss buttercream filling and fresh summer berries in each layer, covered with ivory fondant, and wrapped with a mallard green and gold ribbon (the bride's colours) on each layer. 

And she wanted roses. Lots of big, beautiful, creamy white roses.


I recommended a few other flowers to balance the colours a bit; namely yellow mini roses, some baby's breath, and green ivy. I then made a wire wrapped flower bouquet strand about 4 feet long, and secured it around the cake in a spiral when we set up the cake at the reception site.


Lastly, I made a quick cake topper from some of the leftover flowers, just in case the bride and groom didn't have anything for the top of the cake (they didn't).


This was one of the first times I've worked with fresh flowers for a cake, and there are definitely challenges to keeping the blooms perky long enough to both wire them and display them on the cake. I personally prefer gumpaste flowers; they last for a long time, they can be made well in advance of the cake's delivery date (they need lots of time to dry properly), you can create "fantasy flowers" in literally any shape and colour you can imagine regardless of season or availability, and, stored and handled properly, they keep their shape and colour for a long time. On the minus side, they are far more expensive than fresh blooms because they're much more difficult to create than to just buy fresh, and it's a specialized skill that not all cake decorators have in abundance.

All in all, I'm pleased with how the cake turned out from inspiration to execution, and though I would do some things differently next time, I believe the clients were pleased with their cake too!

Friday, 23 August 2013

Angel Food Cake


In the midst of prep for my wedding at the end of this month (did I mention I'm making my own wedding cake AND the entire dessert table? Yes, I am just that crazy), I also agreed to make a birthday cake for a close friend's awesome mom, who dearly loves my baking. 

Because once again, yes, I am just that crazy.

After the mom and I had an Inigo Montoya-style chat about what historically constitutes a "strawberry shortcake", versus what people tend to think it means today, I did some thinking, some questioning my friend as to what cake flavours, textures, and densities her mum likes the best, and some good-old google-fu. I decided that what would probably be most appreciated was a vanilla angel food cake, torted and filled with sliced fresh market strawberries and a stabilized Chantilly cream for both filling and frosting.

Now, the last time I made an angel food cake from scratch, I was in pastry school, and the recipe made four at a time. So, it was time to research a good quality, foolproof recipe from a chef I could trust, since I really didn't want to waste so much product on an iffy recipe.

There are few TV personality chefs I trust more than Alton Brown, and this time was no exception. Brown's extremely well-researched Angel Food Cake recipe turned out perfectly; so well, in fact, that my notorious habit of tweaking every recipe I use to personalize it more to my tastes was quiescent...I simply could not think of a single change to his AFC recipe that would have improved it an iota, it's just that good.

So without further ado, here is the recipe for the best angel food cake out there. My only recommendation is that you follow it TO THE LETTER, as this cake can be incredibly persnickety and will likely fail on you if you deviate from the recipe! (No pressure).


Source: Good Eats; Episode "Let Them Eat Foam (Angel Food Cake)"; host Alton Brown

Yield: 10 servings
  • 1 3/4 cups sugar
  • 1/4 teaspoon salt
  • 1 cup cake flour, sifted
  • 12 egg whites (the closer to room temperature the better)
  • 1/3 cup warm water
  • 1 teaspoon orange extract, or extract of your choice
  • 1 1/2 teaspoons cream of tartar
Preheat oven to 350 degrees F.

In a food processor spin sugar about 2 minutes until it is superfine. Sift half of the sugar with the salt and the cake flour, setting the remaining sugar aside.

In a large bowl, use a balloon whisk to thoroughly combine egg whites, water, orange extract, and cream of tartar. After 2 minutes, switch to a hand mixer. Slowly sift the reserved sugar, beating continuously at medium speed. 

Once you have achieved medium peaks, sift enough of the flour mixture in to dust the top of the foam. Using a spatula fold in gently. Continue until all of the flour mixture is incorporated.

Carefully spoon mixture into an ungreased tube pan. 


Bake for 35 minutes before checking for doneness with a wooden skewer. (When inserted halfway between the inner and outer wall, the skewer should come out dry).
Cool upside down on cooling rack for at least an hour before removing from pan.

Cook's Note: Since they're easier to separate use the freshest eggs you can get.

Per Serving (based on 10 servings): Calories: 208; Total Fat: 0 grams; Saturated Fat: 0 grams; Protein: 5 grams; Total carbohydrates: 47 grams; Sugar: 36 grams; Fiber: 0 grams; Cholesterol: 0 milligrams; Sodium: 115 milligrams


Saturday, 17 August 2013

I am the ditziest bride-to-be ever.


I have a lot to live up to. 

My younger (baby) sister...she hates it when I call her that...got married to the love of her life last February. I was part of the bridal party. This girl is SO ORGANIZED it's actually a little scary; pretty much everything went off without a hitch, even though they had an outdoor wedding in one of the coldest months of the year, with 75 guests for the ceremony and reception/dinner, and another 50 or so invited for the "after party". I mean, everything FLOWED, man.

I, sadly, am nowhere near as organized as my little sister; I'm still stressing details two weeks before the wedding that I probably should have finalized and completed months ago. I have flip-flopped so much on certain issues it has been incredibly challenging for my sis (who is my moh) to discuss them with me without bashing me over the head with a "make up your frelling mind already!!!!" stick.

So, keeping in mind the things I *should* have done, I thought I'd make up a little "Wedding planning Do's and Dont's List" for everyone's edification and entertainment.

1. Do: decide immediately who you want beside you in your wedding party. This sounds like a "duh" sort of thing, but I managed to screw this up royally. Luckily, my sister doesn't hold grudges for my stupid mouth getting ahead of my brain, but I whoopsied big time and thought I was doing her a favour by not asking her initially to be part of the bridal party, she being a new mum and all. Yeah, not my finest hour. In addition, remember that the people who stand up next to you and your beloved are supposed to be those family members and friends who have been by your side, supporting you and encouraging you throughout your life (or a reasonably large recent portion of it), not just your "BFF of the week". To wit, these lifelong cheerleaders should not just be in your wedding photos and then never seen in your lives again, so choose wisely.

2. Don't: announce your impending nuptials until you've discussed many of the important decisions with your intended, and are ready to answer...or not... those billion questions asked by the well-meaning and the nosy, such as where it's going to be held and when, who is paying for certain aspects of the wedding, reception, dinner, booze, etc., whether you'll be wearing white (*wink wink*), and will you be inviting 2nd cousin Ethel twice removed on your mother's side because she was nice to you once when you were ten (by the way, unless you're having a big Italian style wedding, that answer should usually be "no").

3. Do: decide on your wedding colours fairly early in the game. It makes it much easier for you and your bridal party to find or make your dresses, wedding favours, decor...in essence, those deeply personal, custom "special touches" that mean so much during your big day. If you're constantly changing your mind about something as fundamental as your wedding colours (like I did...derp...), it can really muddy the waters on how you want the whole wedding to look and stress out your wedding party.

4. Do: start looking for your wedding dress at least 6 months before the wedding. Wedding dress shopping can either be fun or a total disaster, depending on a number of factors such as your budget, who is paying for the dress (remember the Golden Rule), your desired style, your dress size *wahhh! this one SUCKS for big girls, letmetellyou...*, your proximity to wedding dress shops (happily, with the advent of online shopping this one is less challenging than before, although buying a wedding dress online--like I did..twice--is a story for another post), and how much time you have for fittings before the wedding.

5. Dont: let Pinterest eat your brain!!! This site is crack for women, my friends. It's an amazing resource chock-full of fascinating photos, ideas, hints, tips, and tricks, but while I wholeheartedly support creating a "wedding ideas" board and linking your bridal party to it, don't be a slave to every new fad and trend and cool idea that is pinned onto your board. There is simply not enough time, money, or space to do everything, and you'll drive yourself crazy, exhaust your maids, and empty your bank account if you try to do everything yourself.

6. Bonus Do and DON'T Combo! DO: remember that, as important and all-encompassing your wedding day may be to you and your beloved, chances are there are very few people outside of your immediate family and wedding party who could give a flying rat's hiney about it.  So DON'T monopolize conversations with fascinating-only-to-you details about your upcoming nuptials. You will eventually find your discussions take on a soliloquy-like tone as you end up the only one talking, while everyone else's eyeballs glaze over while they look for any excuse to get away from you and your incessant rhapsodizing over how *Awesome!!!* and *Perfect!1!* your Special Day is going to be.  When they lunge for the butter knives to jam in their ears hilt-deep, that's usually a good social cue to stop talking about it. Like fifteen minutes ago.

So those are my Big Six Do's and Don'ts, which I didn't personally follow and made things much harder than I had to on myself and every long-suffering member of my family and wedding party.
Learn from my ditzy ways, and have a great, no-stress wedding!

Tuesday, 13 August 2013

How to decorate your wedding on a dime


...to be clear, I don't mean an *actual* dime, I simply mean for far less money than the wedding supply stores would have you believe.

Now that the disclaimer is out of the way...

If you live in a reasonably-sized city centre, have access to a large Dollar store in your area, or are planning on visiting an area which does, I strongly recommend you check out the offerings there before you lay down serious cash at a high-end crafts or wedding store. At one dollar store alone, I saw wedding favour boxes, invitations, cake toppers, boxes of those little bubble blowers for guests, thank you cards, bridal hairpieces, pretty baskets, and a host of other items that, with a little imagination and effort, you can customize to your wedding colours, and personalize so they reflect the style of wedding you want.

In this series of posts I intend to discuss some of the things I did for my wedding, as well as some great dollar store wedding decor/favour ideas I've seen around the interwebs that I never had time to do myself but were pretty nifty! As the tutorial for each wedding DIY could be lengthy, I will post them separately so none of the posts end up too long! When I finish them all I will leave backlinks to the other posts.

Fabric flower guest boutonnieres/corsages:

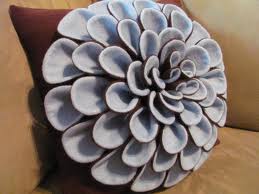
One of my all-time favourite crafts have been these little flower corsages/boutonnieres. I've made a bunch of these for my wedding guests, which will be interspersed with some real and paper flowers, a pair of scissors, and some safety pins in a DIY Boutonniere station. The idea was to have a fun little task for our guests to work on while we're waiting for the all-aboard so we can cast off (our wedding is on a boat that will be cruising around the Toronto harbour for several hours). I also have a few of the best ones that I made in my wedding colours, which I have interspersed throughout my bridal bouquet. Lastly, I made a series of these flowers, in broadcloth in my main wedding colour, and attached them to the fronts of the personalized thank you cards I sent to the guests who attended my bridal shower last month (and yes, I bought the pretty blank cards at the dollar store, so there's another savings!)

In any case, on to the flowers themselves: I used both cotton regular-weight broadcloth in a multitude of colours and some smashing-looking felt too.  I finished them with beads, plastic gems, or buttons depending on my whims.  The most important thing to have for this craft besides a good, sharp pair of scissors is a glue gun; in my honest opinion, you absolutely can't do this craft without one.

Despite their fiddly nature, these are surprisingly easy to do; you don't have to be super-accurate, which is nice.  As long as you have a reasonably steady hand, don't mind the tedium of cutting out and shaping each petal individually (or you can buy yourself some fabric petal cutters, but I was going for cheap-to-nearly-free-so-use-what-I-have), and can figure out the quadrants on the face of a watch (3 o'clock, 6 o'clock, etc.), then you can make these up in a trice. I did most of mine while plowing through several episodes of Law and Order: CI and CSI: Miami. Aww yeahhhhh.....

Supplies:
  • An amount of light to medium-weight fabric in your choice of colour and pattern -- the sky's the limit. Best choices are non-ravelling fabrics such as cotton and felt, which hold scissored edges well, but feel free to experiment with different fabrics to see what works best for you. Foam sheets could be cool too!
  • A sharp pair of scissors, clean and rust- or stain-free so they don't damage your fabrics
  • A crafting glue gun, using low-temp glue
  • A handful of glue sticks, of the type for gluing fabrics together
  • A clean, protected working surface (be warned, those hot glue guns tend to drip!)
  • Pin backs or something to help stick the finished flower to whatever you're going to stick it to
  • Petal fabric punches, two sizes (optional)
Instructions:
  • Assemble your supplies. Decide on the amount, colour/s, and relative size of your finished flowers (this is completely subjective and in accordance with your intended use; each of my flowers in the photos are about 3-1/2" in diameter, so I will give instructions based on those calculations).
  •  Choose a backing colour for your flowers; the backing circle (mine were about 2" in diameter) can sometimes be seen through the petals, depending on the fabric used for the petals. I used felt for some stability and decided on some green and some white backs. Cut out as many backing circles as you want flowers. I won't insult your intelligence, dear readers, by giving you exhaustive instructions on how to cut a perfect circle, but simply mention that there's no need to break out the protractor if you take the time to go on a five-minute treasure hunt through your own home. Cups, bowls, jar lids, buttons, you name it; they're all round. Find the size that best fits what you need and trace its shape onto some felt backing, then cut out. If it helps, here is a template that will give you an idea of the relative sizes of petals and the backing circle:
    Feel free to customize the petal shape a bit; try some new things!  I won't judge. I got some of my nicest looking designs from altering the petal shapes a bit. I also only used the largest and smallest petal shapes, and not the middle size.
  • Speaking of petals, you will need at minimum two sizes of petals. I decided on a loose petal dahlia-style, with only 2 layers, though if you make your backing circle large enough you can make a multi-layer dahlia-or-poinsettia-style flower that will "dome" beautifully.
  • Cut out and shape the petals; for a flower like mine, I needed 8 large and 8 small petals; for larger dahlias or multi-layered dahlias you will need more. Make many more than you need; you may find that certain petals fit better together than others anyway.
  • A few minutes before you are finished cutting and shaping your petals, plug in your glue gun  and keep it handy; now is the time to bring 3D life to your petals! Holding the petal pointy-end away from you with your thumb and index fingers of your left hand (or if you're a lefty, the right hand), carefully and SPARINGLY glue a thin line of glue along the bottom of the petal. Immediately pinch closed and hold for a 5-count until the glue cools and sticks. For a different, more "cone" look to the petals, instead of pinching the two raw ends together, fold each bottom end's corner in towards the centre along the line of glue.
 
  •  
    Left = "cone" shape; Right = "pinch" shape


For a "ruffled" look, crease the centre bottom then glue the two edges together. 


  • Start attaching the largest petals to your backing circle by placing a small line of glue at the 12 o'clock position on the edge of the petal and 1/4" inwards; place the petal pointy-end outward vertically along the glue with the petal sticking out at least 1/2" beyond the backing circle, press down gently until sealed. Repeat this for 6 o'clock, 3 o'clock and 9 o'clock. Now start filling in around the perimeter of the outer circle with the largest petals, symmetrically, until all the spaces are filled.  Do not crowd the petals, but don't leave any gaps either.
  • Repeat the the inner circle, using the next-smaller petals, again using the 12-6-3-9 o'clock method to ensure the flower is symmetrical. IF you are making a larger flower, repeat these steps until you have filled in the entire flower with only a small untouched circle in the middle.
  • Using a gem, button, bead, or other item of your choice, hot glue into the centre of the flower and gently press down until the glue cools.
  • Place the pin attachment on the back of the flower.
Here are some examples of felt flowers you may want to use as inspiration (with thanks to etsy, craftsy, and various blogs and tutorials I borrowed these beautiful pics from!).  My apologies for showing only the dahlia-style flowers made from felt; when I tried to find more pictures of flowers like I had done, I wasn't able to find any!  Has nobody else thought of making felt dahlias...NOT out of felt?  Not as far as I can figure! In any case, so endeth my first long-winded tutorial on how to make fabric dahlia-or poinsettia style flowers. Good luck, and let me know if you have found this tutorial useful!


Thursday, 8 August 2013

Welcome to my brain droppings!

*blah blah vanity blog, blah blah*

What is the purpose of this blog, you may be asking?  You may wonder why you're even bothering to read further than this line here, as I've already failed to capture your attention....so let me explain.


After co-hosting a mildly successful baking blog for a couple of years, I felt it was time to start anew with my own blog, dealing with not only my baking exploits but my other interests as well.  And, since I have been accused of having the memory of a goldfish and the stick-to-itiveness of Hammy the Squirrel from the animated movie Over the Hedge, I tend to have a LOT of interests!  In my own defense, I do tend to go back to my "old" interests in a cyclical manner, depending on what's going on in my own life, the seasons, and whether anyone has asked me to make them something. This blog will be a good place to post pictures and tutorials on how I made stuff, as well as occasionally write about stuff going on in the world or my own little world.

So, a list of the hobbies and interests I've been pursuing over the last several years:
  • Baking: My most successful and long-run "hobby"; it's more of a passion, really, and I *do* have professional training in this and my own micro cake-decorating business. I still count it as a "hobby", however, until I start making enough money to support myself financially. Which will probably be never.
  • Knitting: Lots of scarves and a few blankets at this point.
  • Crocheting: an abject failure so far; but I shall persevere!
  • Quilting: I bought a sewing machine years ago for this purpose, and I have tons of fabric since I can't seem to stay away from fabric stores...but I haven't made a single quilt square to date. I'm getting there, though! One day...
  • Fabric Arts: I got into this recently because I decided to make both guest boutonnieres and a bridal bouquet for myself out of non-perishables, such as brooches, bead flowers, and fabric flowers. 10 glue sticks later and a lot of burn marks on my fingers, and I can happily say SUCCESS! Pics and tutes of the bouquet after the wedding.
  • Computer games/surfing the 'net: While technically a hobby, it's not exactly within the same sphere as listed above, but I list it anyway for full disclosure.
  • Board and tabletop RPG's (role playing games): Yes, I'm "one of those".
I also have other interests that are less "hobby" and more "activity" related. But, since this is not a dating site and I don't want to bore you any further, this is what I'm sticking with.

Well, that wasn't an exactly efficient "sum-up", but I hope to bang all the rust off my writing style soon, and get to some more interesting posts!

Thanks for reading, and I look forward to feedback!